Slice Form/ Kaleidoscope Project
Slice FormDescription
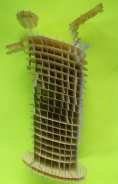
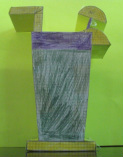
This piece of the project required us to make a drawing. This picture needed to take up half of the paper, contain at least one arc, and have at least one angle that was not 90º. I decided to create a glass of lemonade. After we had this drawing, we used it as the base for a prism. Once we completed this 3D version, we calculated the volume and total surface area of the prism. After this step, we began to draw circles and other shapes that, when assembled would create a slice-form version of the drawing.
|
KaleidoscopeDescription This portion of the project involved using a free program called GeoGebra to create shapes and animate them. To do this, we stated by making a circle. Then we put a point on this circle and used this as one of the vertexes of a shape. After using the shape tool to create this shape, we used the line tool to divide the circle into different sectors. Once we had these lines, we reflected the shape across them to create copies of the shape. Once we had these copies we changed their colors so that half of them were different than the others. Finally, we right clicked on the orignal vertex and animated it. After that we repeated these steps as many times as we wanted to so that we could make more complex kaleidoscopes.
| ||||
Reflection
This project taught me the concept of using algebra and geometry to create 3-D forms. I used algebra in this project to figure out the area of my base and used geometry to create and assemble the slice form. This portion was what I found to be difficult as the slice form fell apart time and time again as I attempted to build it. Because of this, I disliked the construction of the slice form, however I enjoyed the other section of this project involving creating a kaleidoscope. This project taught me how to make a kaleidoscope in GeoGabra and also taught me how much I dislike making slice-forms.
The following problems show how my geometry skills have progressed so far.
Assignment 4 Question 2
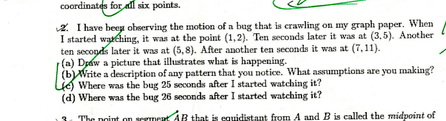
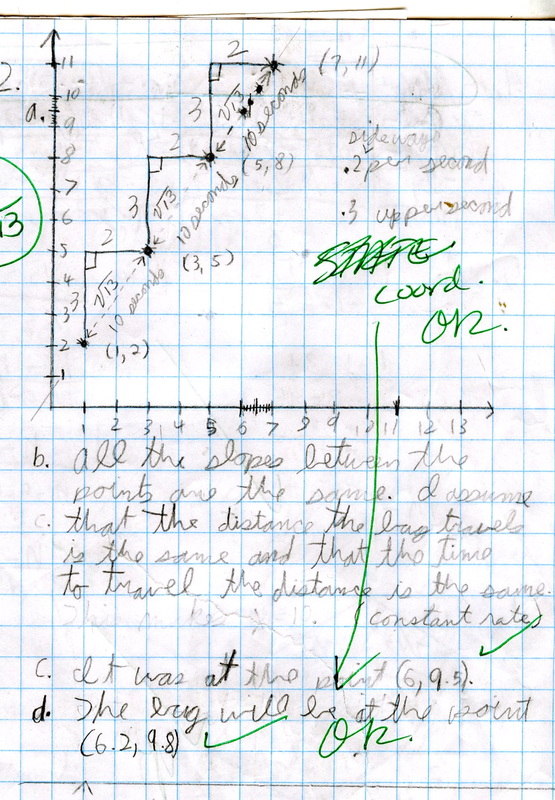
Answering question 2 took several separate steps. First, I had to answer part (a). To do this I first drew a coordinate plane. Then I plotted the given points and drew a line connecting those points. After I finished part (a), I moved onto part (b). To answer this question, first I wrote that the line had the same slope between all of its points. Secondly, I wrote that I was assuming that the time to travel between the point was the same, and that the distance was also the same. To answer part (c) I simply found the midpoint between the second to last point and the last point by using half of the original slope. This method proved my answer to be the point (6, 9.5). To find part (d)'s answer, I divided both the segment between 6 and 7 on the x-axis, and the segment between 9 and 10 on the y-axis into tenths. Then I found out that the bug moved 0.2 to the right per second and 0.3 up per second. After that, I estimated the point's position based on that rate and the marks I had made on my graph, thus finding the answer (6.2, 9.8).
Assignment 10 Question 4

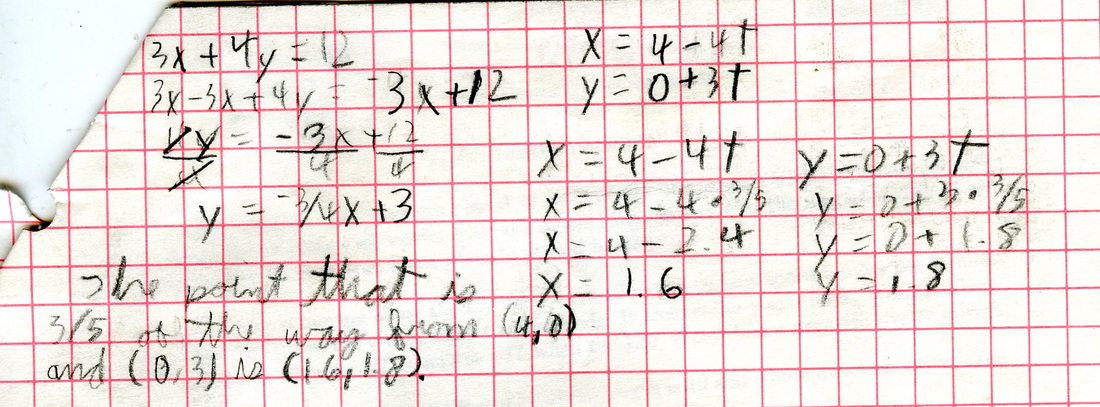
My first step in solving this problem was convert the equation 3x+4y=12 from standard form into slope intercept form. This step would leave us with the equation y= -3/4x+3. Then I set up the basic parametric equations X=h+∆xT and Y=k+∆yT. After that, I replaced the h in the x equation with 4 and the k in the y equation with 0, giving us the equations X=4+∆xT and Y=0+∆yT. Next, I replaced the ∆x with -4 and the ∆y with 3, thus leaving us with the equations X=4-4T and Y=0+3T. Then I substituted 3/5 for T in both equations and found the equations X=4-4•3/5 and Y=0+3•3/5. Finally, I solved both equations for the x and y components and was left with (1.6,1.8) as my answer.
|
Assignment 4 Question 2 Answer
Part (d) of this problem could also be solved with the use of parametric equations. To solve the problem this way, the first step that I would take would be to write the basic parametric equations, X=h+∆xT where h is the position of X when T is zero and Y=k+∆yT where k is the position of Y when T is zero. Then I would set the bug's starting point as T=0. This would make the equations be X=1+2T and Y=2+3T. After that, I would substitute 2.6 for T and get the equations X=1+2•2.6 and Y=2+3•2.6, which when solved gives me the answer (6.2, 9.8).
Assignment 10 Question 4 Answer
|
Finding Lines of Reflection
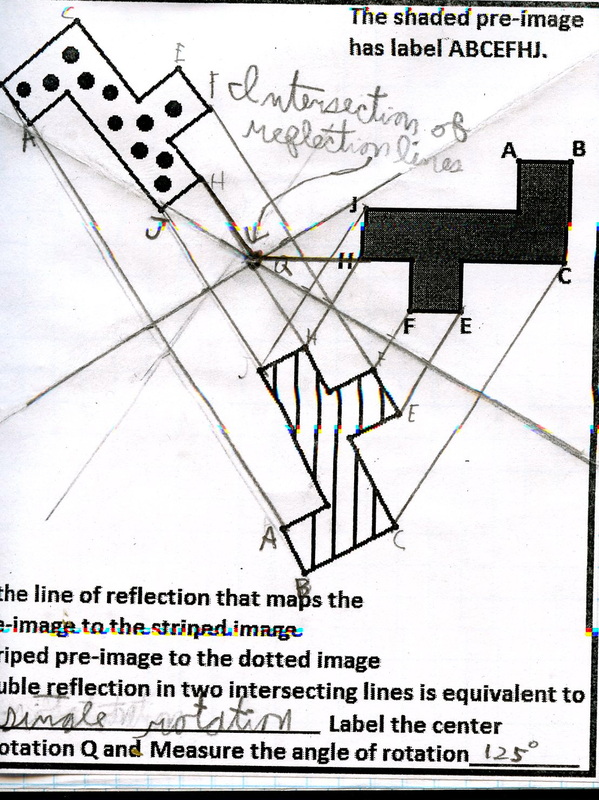
To find the line of reflection, the first step is to label the reflected shape's points with the letters of the equivalent points on the original shape. Then, you must connect several of the points on the original shape with their equivalents on the reflected shape. Once, you have these line segments, you must find the midpoint of each line segment. When these midpoint are drawn, you need to draw a line connecting all of the midpoints. This line is the line of reflection.
Finding Points of Rotation
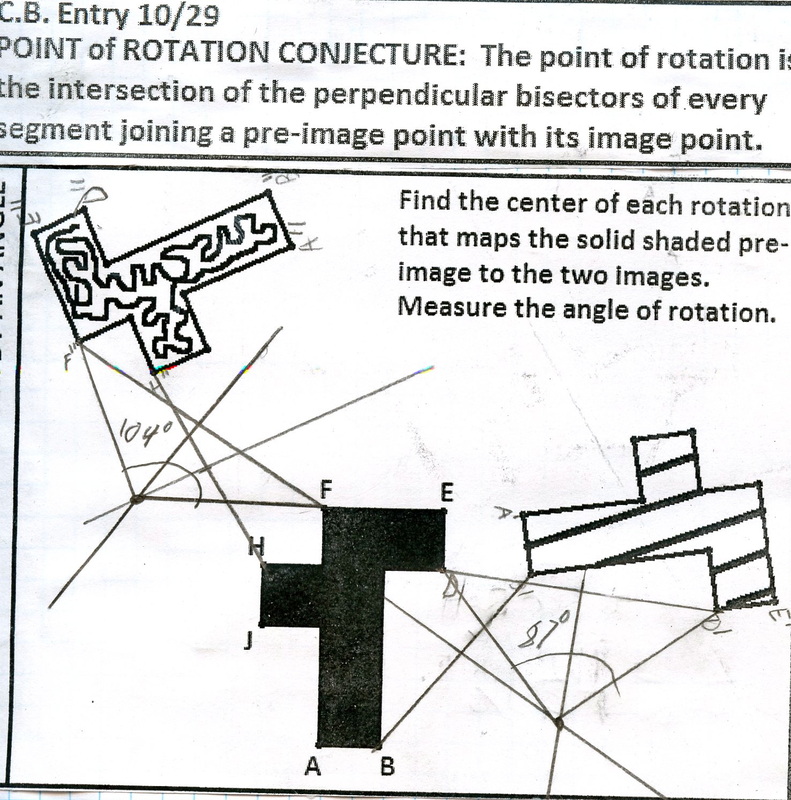
To find the point of rotation, first you must label the points on the rotated shape with the letters of the equivalent points on the original shape. Then you must connect several of these points. After that you need to find the midpoints of all of these line segments. When you have found these midpoints, you must draw a separate perpendicular line through each of these points. The point where these many perpendicular bisectors intercept is the point of rotation.
Double Reflections
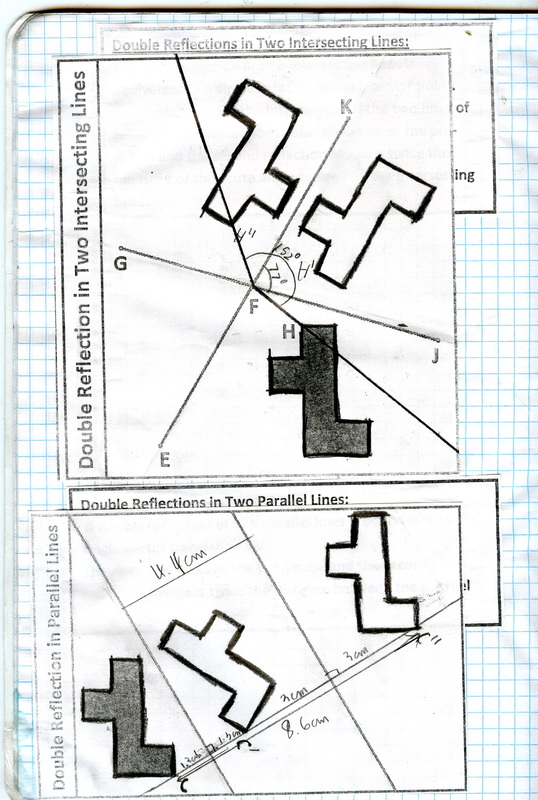
There are two kinds of double reflections, a double reflection across intercepting lines, and a double across parallel lines. For a double reflection across intercepting lines, the first step that I took was outlining the original shape with pencil. Then, I folded the paper on the first line of reflection, this left a light outline of the original shape in its reflected position. Next, repeated the first step and folded the paper across the second line. This completed the double reflection, but then I noticed that this type double reflection is equal to a single rotation. To find the angle of rotation, I drew line segments from the point of rotation, F to both points H and H". Finally, I used my protractor and measured the angle of rotation.
For a double reflection across parallel lines, my first step was outlining the original shape in pencil. Then a folded the paper across the first line. This step left an outline of the original shape in its reflected position. Next, I redid step one with the new shape and folded across the second line of reflection. When this step was complete, I noticed that this kind of double reflection is equal to a slide from the first shape to the last shape.
For a double reflection across parallel lines, my first step was outlining the original shape in pencil. Then a folded the paper across the first line. This step left an outline of the original shape in its reflected position. Next, I redid step one with the new shape and folded across the second line of reflection. When this step was complete, I noticed that this kind of double reflection is equal to a slide from the first shape to the last shape.
